Fried Rice

img_4284

My mom is the queen of the kitchen, which meant growing up I never cooked! Fast forward to 2005 standing in my kitchen in Connecticut I figured fried rice would be the easiest thing to pull off, right? Wrong! While it tasted good, the texture was completely off, more like awful, because of some obvious mistakes. What followed was a teary conversation with mom, mostly because I was really homesick and couldn’t even cook myself a decent warm meal. This post is more about the secret tips that mom shared with me that day, than about the actual recipe. This recipe is a basic one and can be modified to make your own. Add different vegetables, may be some protein…

The secret to a good fried rice is starting with cold cooked grains! Now that I think of it mom always cooked the rice the day before. The reason is simple, dehydration of the grains. Refrigeration makes the grains dry, and then when cooked it gets hydrated just right. Fresh cooked rice gets mushy! When in the moment spread fresh cooked rice in a baking sheet and chill it in the refrigerator for 15-20 mins. This will take care of any residual moisture and give your dish the fried texture.

Heat! High heat is important. As my mom’s lil helper I would love adding things to the pan but I wasn’t that patient. So I would go “Aikhon Di”(should I add now) and mom would roll her eyes and say “Daada, gorom hoi ni”(wait its not warm enough yet) because it was probably the 4th or 5th time! High heat ensures that whatever is added to the pan gets fried quickly, so the rawness goes but the crunchiness stays.

“Ghatish Na”(Don’t stir it too much) was what she screamed at me when this eager helper, kept stirring the rice. Constant stirring will cause the grains to break and get starchy, then mushy. Also it prevents the rice from getting that crunchy crusty texture. So spread the rice out in the pan, let it sit for a minute or so before flipping it.

So the secret to Jhojhore (fluffy), slightly crusty fried rice is – dehydrated cooked rice, cooking in high heat and no to constant stirring! To never again mushy fried rice… Happy cooking!!

Time for Prep: 10 mins     Time to Cook: 10 mins     Yield: 4-5 Servings     Level: Easy

Ingredients:

  • 2 cups rice, cooked.
  • 1 tbsp butter
  • 1/4 cup red bell pepper, chopped
  • 1/4 cup yellow bell pepper, chopped
  • 1/4 cup orange bell pepper, chopped
  • 1/4 cup green bell pepper, chopped
  • 1/2 cup carrots, chopped
  • 1 onion, chopped
  • 1/2 cup green peas
  • 1/2 cup sweet corn
  • 1/2 cup scallions, chopped
  • 1 tbsp soy sauce
  • 2 tbsp black pepper, ground
  • salt to taste

Process: 

  1. Heat oil in a wok, add the vegetables (except scallions) and sauté in high heat for 4-5 mins, just so that the rawness goes but they still retain the crunchiness.
  2. Add cooked rice, salt, ground black pepper and butter, stir it in and cook for another minute or so.
  3. Pour the soy sauce, around the edges of the wok and gently fold it in.
  4. Remove from heat, garnish with chopped scallions and serve.

Kadai Paneer

img_6508

Kadai is a thick bottom circular cooking pan, similar to a wok, but with steeper sides, an essential in every Indian kitchen. This dish is traditionally cooked in one and hence the name Kadai Paneer. The combination of the the tangy tomato gravy balanced with a dash of sweetness from cream followed by a garnish of dried fenugreek leaves makes this dish. It’s rich texture and ease to cook makes it a perfect dish to cook when entertaining. So far I have never had leftovers and always find myself writing this recipe down for people.  img_6488

I am good at figuring things out and really enjoy the process of deconstructing a dish, understanding the various ingredients that went in it and building it all together. This dish is one of them, I had an idea of this dish and I modified it to be my own. Traditionally ginger, garlic and a few more whole spices are added to this dish. I prefer it without those.

I have made this dish for my vegan friends and its easy. For a vegan version, use Tofu instead of Paneer and cashews for the creamy sweet richness. Even my non-vegan friends love that variation.

Time for Prep: 10 mins     Time to Cook: 25 mins    Yield: 4-6 servings    Level: Easy

Ingredients:

  • 10 oz Paneer
  • 1 onion, julienned
  • 1 small green bell pepper, julienned
  • 1 small red bell pepper, julienned
  • 1 plum tomatoes, diced
  • 1/2 cup tomato puree
  • 1 bay leaf
  • 2-3 dried red chilli
  • 1/2 tsp cumin seeds
  • 1/2 tsp caraway seeds
  • 1/2 tsp coriander powder
  • 1/2 tsp cayenne or red chilli powder
  • 1/2 tsp turmeric
  • salt to taste
  • 1 tbsp butter
  • 1 tsp garam masala
  • 4 tbsp fresh cream or heavy cream
  • 2 tbsp dried fenugreek leaves (Kasoori Methi)

Process:

  1. In a heavy bottom pan, heat butter over medium heat. Add bay leaf, dried red chilli, cumin and caraway seeds.
  2. When the tempering starts spluttering and you can get the aroma, add onions. Saute for 4-5 mins, till they get a little caramalized.
  3. Add the red and green bell peppers, mix it in, then garam masala,cayenne, coriander powder, turmeric and salt. Mix everything in, sauté for 3-4 mins.
  4. Add the chopped tomato fold it in. Cover and cook, stirring on regular interval until it gets mushy or 4-5 mins.
  5. Add in tomato puree, cover and cook for another 5 mins, to take away the rawness.
  6. Add Paneer, fold it in and cook for 2-3 mins.
  7. Add cream, mix it in and turn of the flame. Do not cook after adding cream or it will curdle.
  8. Garnish with Kasoori Methi.

Serve with naan or chapatis.

Aloo Pyager Chorchuri (Potato-Onions Stir-Fry)

IMG_2088

Chorchuri is a char flavored bengali style stir fry, Chorchori being the noun and the vegetable used to make it, the adjectives. As a child I had asked my mom why this dish was called Chorchori, she said it is because when the vegetables are getting charred, they make a sizzling sound that sounds like ‘chor’ which is also an indicator that the dish is almost done. I am not sure if that’s accurate or not, but thats the story I go with.

Any number of vegetables can be used to make this, but in the Aloo loving Mukherjee household, potatoes have always been the main ingredient with others making a guest appearance or not. This particular dish was a breakfast favorite served with Luchi or Bashi Porotha (Stale Parathas made the night before). There is something about warm porotha, potatoes along with the smell and taste of mustard oil that makes it one of the most comforting dish for lazy mornings.

The charred part is the best part of the dish and my sister and I always called dibs on who gets to clean up (read lick) the wok, mom won most times, go figure!

fries-how-to-cut

I like to cut the potatoes and onions in wedges, because thats how my mom did it, but its not a rule.

This and a few other bengali recipes will call for Paanch Phoron for tempering. It is a combination of Cumin Seeds, Mustard Seeds, Fenugreek Seeds, Fennel Seeds and Nigella Seeds in equal proportion. 


Time for Prep: 20 mins     Time to Cook: 20-30 mins    Yield: 6 servings    Level: Easy

Ingredients:

  • 2-3 medium size potatoes, cut into wedges
  • 1 medium sized onion, cut into wedges
  • 3-4 green chile pepper, slit
  • 1 tbsp Paanch Phoron
  • 1 tbsp oil (preferably mustard oil)
  • 1 tsp turmeric
  • salt to taste
  • 2 tbsp cilantro, chopped for garnishing

Process:

  1. Heat oil in a Wok on medium heat, add paanch phoron. Sauté till aromatic.
  2. Add the potatoes, onions, green chili pepper,  turmeric and salt. Sauté, cover and cook till vegetables are done (tender) around 12-15 mins.
  3. Let the vegetables char a little at the bottom.
  4. Remove from heat, fold in the thin charred crust.
  5. Garnish and serve.

Note:

  • If you want to add some protein in to it, shrimp or scallops is the way to go.

Peas Pulao

IMG_4106

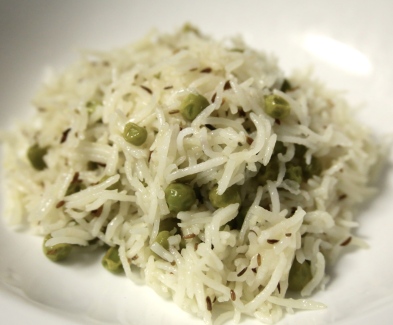
This past week marked the 42nd wedding anniversary of my parents, growing up we celebrated the day with a gathering of friends and family and my mom like always cooked up a feast. Peas Pulao or ghee bhaath, always played an award winning supporting role, complimenting the flavors of the side dishes. In my opinion this dish is the underdog of bengali cuisine and never gets its due credit. Long grained basmati rice flavored with aasto gorom moshala (whole spices), jeere (cumin) and ghee makes for perfectly light and aromatic companion to pretty much any side dish, or to be eaten as is.

Time for Prep: 5 mins     Time to Cook: 15 mins     Yield: 6 Servings     Level: easy

Ingredients:

  • 2 cups of Basmati rice
  • 1/2 cup green peas (fresh or frozen)
  • 1 inch stick of cinnamon
  • 4-5 green cardamom
  • 1 black cardamom
  • 1 Bay leaf
  • 7-8 cloves
  • 1 tbsp black peppercorns
  • 2 tsp caraway seeds
  • 2 tsp cumin seeds
  • 1 tbsp cilantro, chopped
  • 1 tbsp mint, chopped
  • 2 tbsp ghee or oil
  • 1 tbsp lemon juice
  • 3.5 cup water or broth.
  • Salt to taste
  • 1/4 tsp sugar

Process:

  1. Rinse and soak rice for 30 mins. Drain and set aside.
  2. In a heavy bottom pan heat the ghee and add caraway seeds, cumin, cinnamon, cardamom, bay leaf, cloves, black peppercorns. Sauté for till you begin getting the spice aroma around 2-3 mins.
  3. Add the drained rice, which should’ve gotten a little dry by now. Mix and sauté for around 2 mins or until the rice is well coated and starts to glisten.
  4. Add green peas, cilantro, mint and sauté for a minute before adding water, salt, sugar and lemon juice. Stir slightly.
  5. Cover and let cook for around 12-15 mins, when the rice is almost done and there is still a little bit of moisture remaining. Turn off the heat and let it sit for 20-30 mins.
  6. Using a fork, fluff up the rice a little. Serve with your favorite side dish or with just Raita.

Notes:

  • For rice that is fluffy and each grain of rice is separated drain and spread soaked rice on a paper towel or cotton towel to dry it out before cooking. While cooking fry/sauté the rice grains for a 2-3 mins before adding water. While doing so make sure that you don’t stir too vigorously, that will break the rice grain and you will not get those long grains of rice that are visually so appetizing.
  • If your using frozen green peas, thaw it before using.

Bangali Tikona Porotha (Triangle Paratha)

IMG_4089

“Good bread is the most fundamentally satisfying of all foods; and good bread with fresh butter, the greatest of feasts.” – James Beard 

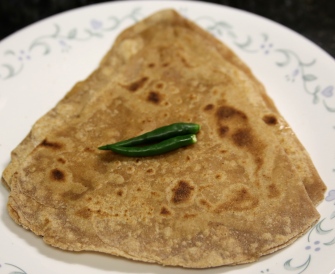
This statement holds true for any kind of bread there is, especially Parathas. There is something deliciously satisfying about hot fresh off the griddle parathas on cold wintry evenings. All I need with it is some salt, a couple fresh green chile and fresh butter, Yum! Short-Cut Ranna (Cooking) in our house on lazy cold evenings usually meant Aloor Pyager Chorchori and Porotha, a few extra would always be made for my dads favorite breakfast of Baashi Porotha and Lonka (One day old paratha with fresh green chilli) the next morning. A ritual every time we were T-few hours away from a family vacations.

Parathas are very popular in India and pretty much every region has a version or two of it. I am calling this Bangali, because so far I have only eaten this shape of paratha in bengali households. Tikona in Bangla means triangle.

Time for Prep: 10 mins     Time to Cook: 15-20 mins    Yield: 10 parathas    Level: Easy

Ingredients:

  • 1.5 cup whole wheat flour + more for dusting
  • 1/4 cup all purpose flour (optional)
  • 1 tbsp ghee or oil as shortening + more for cooking
  • 1/4 tsp salt
  • Warm water as needed to make dough

Process:

  1. Making the dough:
    • In a wide mouth bowl/ food processor mix in the flour and ghee/oil.
    • Then gradually add in the warm water and work the flour to make dough.
    • Knead till the dough is soft, smooth, pliable and does not stick to your hands.
    • Cover with damp cloth/paper towel and let sit for 20-30 mins.
  2. Rolling the Paratha:
    • Take a golf ball size portion of the dough and roll it into a ball.
    • Dust it with flour and flatten it using your fingers to form a disc.
    • Place the disc on a flat surface and roll it out into a circle around 1/8 inch thick.
    • Brush the surface with a little bit of oil/ghee. This is just to make the parathas flaky, don’t use too much oil, just a drop or two and spread it out.
    • Fold into half to make a semi-circle
    • Brush surface with a little bit oil/ghee
    • Fold again to make a quarter of a circle.
    • Dust it with a little flour and roll it into a triangle shape (roughly) around 1/8 inch thick.
  3. Cooking the Paratha:
    • Heat griddle to medium-high heat (I usually test by waving my palm over the griddle to feel if its hot enough). If your using one of the electric griddle with temperature control, heat griddle to 375-400F.
    • Toss one of the rolled paratha on a heated griddle.
    • Flip when it begins to puff a little.
    • Press down the sides with a spatula to ensure they get cooked too. It will ballon up a little at this stage.
    • Brush a little oil/ghee and flip.
    • Again press down to ensure corners are cooked.
    • When you see a few dark spots forming here and there, on both sides, take it off the heat.

Notes:

  • My mom says that cooking the rolled side (top part touching the rolling pin) first results in better parathas.