Qabooli Biryani (Lentil Biryani)

IMG_2159

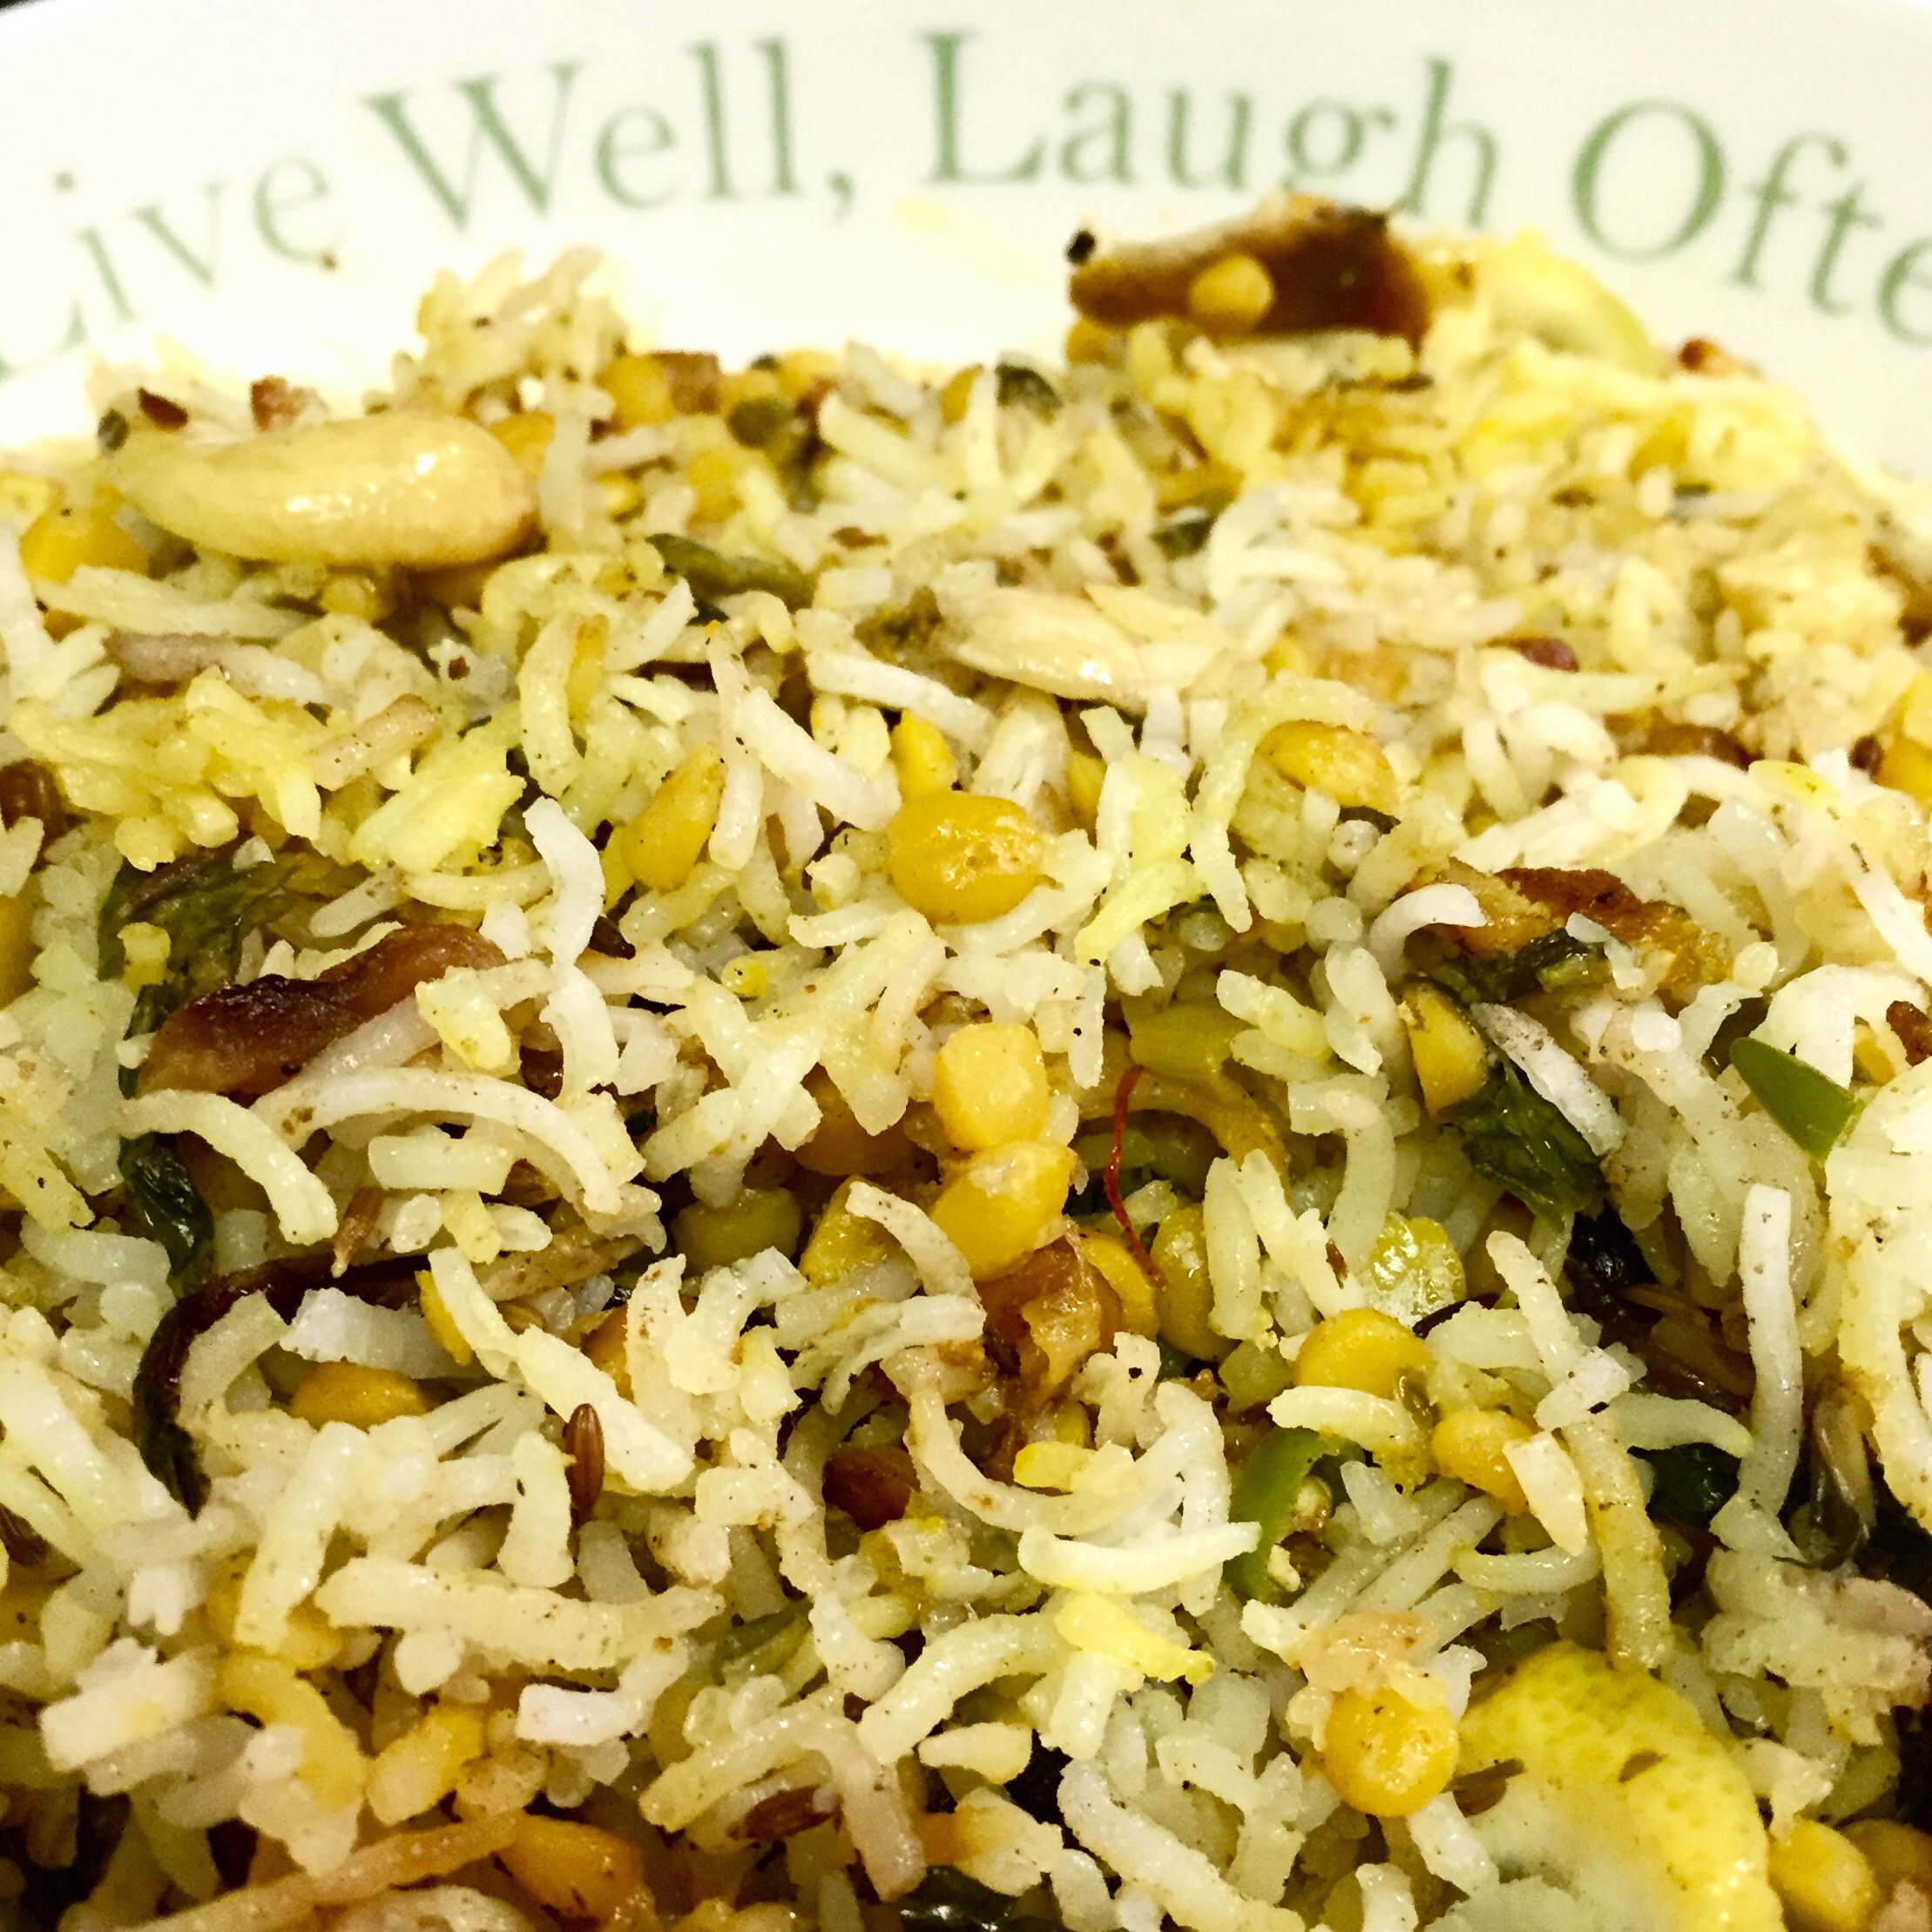
I grew up in Hyderabad, a city famous world over for its delectable Biryanis. In my opinion mutton (goats meat) Biryani is the best, but since I am married to a vegetarian, I have made a few vegetarian versions of it as well. This is one of them. The nutty flavor of channa dal adds a special touch to the dish. Don’t be misguided by its simplicity, it looks unassuming but, in one bite the blend of spices, ghee and caramelized onions will definately take you to the land of nawabs.

My secret to this classic recipe:

  1. I don’t deep fry the onions, instead I patiently caramelize them in low heat. The end result is both delicious (you can really taste the sweetness of the onions) and heart healthy (Which I am becoming increasingly conscious of as I get older).
  2. Since I use very little oil, I choose good old fashioned Ghee.
  3. I use fresh whole spices and make Biryani Masala as part of my preperations (Will post my recipe shortly)

This is not a dish for the weeknight when you want a quick fix, this is more for those weekend lunches when you want to indulge but not too much. I prefer this with just a side of raita.

Time for Prep: 20 mins     Time to Cook: 1 hour      Yield: 4 Servings     Level: Medium

Ingredients:

  • 1 large onion, thinly sliced
  • 1 tbsp oil
  • pinch of sugar
  • 1/2 cup cilantro, chopped
  • 1/2 cup mint leaves, chopped
  • 3-4 green chili pepper, chopped
  • 1 tsp garam masala or biryani masala
  • 2 tbsp milk, warmed
  • 1/4 tsp (a generous pinch) saffron
  • 1/2 lemon, thinly sliced
  • 2 tbsp cashew nuts
  • 2 tbsp raisins

For Rice Layer:

  • 1.5 cups basmati rice
  • 1 tsp caraway seeds
  • 1 bay leaf
  • 4 cups water
  • 1/2 tsp ghee or oil
  • 1 tsp salt

For Channa Dal Layer:

  • 1/2 cup channa dal (split yellow peas)
  • 1.5 cups water
  • 1/2 inch ginger, grated
  • 3-4 garlic cloves, minced
  • 1 tsp garam masala or biryani masala
  • 1/4 tsp turmeric
  • 1/2 tsp chilli powder
  • 1 tbsp ghee
  • 1/2 cup yogurt
  • salt to taste

Process:

  1. Cooking the Rice:
    1. Soak rice in cold water for 30 mins, drain
    2. In a pan bring 4 cups of water to a boil, add the caraway seeds, bay leaf, rice and oil.
    3. Cook the rice till its about 1/2 way cooked (the grains become opaque but not mushy)
    4. Drain, rinse with cold water (so that they don’t continue cooking in remnant heat) and set aside.
  2. Caramelizing Onions:
    1. In a heavy bottom pan heat 1 tbsp oil, add the sliced onions and caramelize till they are brown. Add a pinch of sugar to get a rich brown color.
    2. Remove from heat, add a pinch of salt and set aside.
  3. In the same pan add the cashew nuts and raisins and sauté for 1-2 mins, remove from heat and set aside.
  4. Cooking the Channa Dal:
    1. Soak the dal in water for 1 hour, drain
    2. In a pan (you can use the same pan that was used to caramelize the onions) heat 1 tbsp of ghee, add the channa dal and sauté for 1-2 mins.
    3. Add the ginger and garlic, sauté for 2 mins, mix in the turmeric, chill powder and garam masala.
    4. Add in the water and salt.
    5. Cover and cook till the dal is cooked but not soft or mushy.
    6. Remove half of it out and set aside.
    7. To the other half add some of the caramelized onions, yogurt and mix well.
  5. Assembly/Layering:
    1. First layer is the channa dal with the yogurt.
    2. Sprinkle 1/3 of the chopped cilantro, mint leaves, green chili pepper, sautéed cashews and raisins and garam masala.
    3. Put a couple slices of lemon
    4. Add a layer of 1/2 the rice
    5. Add a layer of the second half of the channa dal (without the yogurt)
    6. Sprinkle 1/3 of the chopped cilantro, mint leaves, green chili pepper, sautéed cashews and raisins and garam masala
    7. Put a couple slices of lemon
    8. Add a layer of the rest of the rice
    9. Top this layer with remaining chopped cilantro, mint leaves, green chili pepper, sautéed cashews and raisins and garam masala
    10. Add the saffron in warmed milk and pour it over the top most layer.
    11. Close the lid and cool in low heat for 25-30 mins.

Notes:

  • For best results for the Dum style cooking, if cooking in a pan seal the lid so that the steam doesn’t escape. This can be done with a basic flour dough.
  • You can bake it in the oven as well. Assemble in a oven proof casserole, cover with foil and cook for 20-25 mins at 350F/180C.
  • If cooking in a pressure cooker, layer and cook for 20 mins without the weight.
  • If cooking in rice cooker, layer and follow manufacture instruction for cooking white rice.

Hyderabadi Khatti (Sour) Dal

IMG_2103

A couple centuries ago Garam Masala and the famous Dum Pukht (slow cooking) style of the Persians met the sourness of tamarind and the sweetness of coconut of the local Telugus and the delectable Hyderabadi cuisine was born. While Hyderabad is most famous for its Biryani and Haleem, which is a staple for any kind of celebration, everyday Hyderabadi food is just as delicious.

Khatti dal is one of my favorites, add some steamed basmati rice, talahuva bhindi (fried okra) and we are gold!

Time for Prep: 10 mins     Time to Cook: 25 mins      Yield: 6 Servings     Level: Easy

Ingredients:
For the Dal:

  • 1 cup toor dal (pigeon pea)/masoor dal (red lentils)
  • 3-4 Green Chilli Peppers, finely chopped
  • 1 inch Ginger Root, grated
  • 4-5 garlic clove, minced
  • 2 plum tomatoes, finely chopped.
  • 6-7 Shallots, Cut
  • 1/2 tsp Salt (or more depending on your personal taste)
  • 1/2 tsp Turmeric powder
  • 1 tsp chilli powder/cayenne
  • 1/2 tsp tamarind paste (or soak 1 inch chunk of Tamarind in water)

For Tempering:

  • 1 tsp cumin
  • 1 tsp mustard seeds
  • 4-5 curry leaves
  • 2-3 dried red chillies
  • 2-3 garlic cloves
  • 1 tbsp ghee (clarified butter)

For Garnish:

  • 2 tbsp fresh Cilantro, chopped

Process:

Cooking the Dal:

  1. Rinse and soak the lentils for 30-40 mins.
    1. Drain the water, transfer it to the cooking pot. To this add the half of  chopped onions and tomatoes, all of the green chillies, ginger, garlic, salt and turmeric. Add 3 cups of water.
    2. Cook on high heat till you get a boil, then reduce heat to medium and let cook till the lentils are soft. If the dal is too thick, you can add more water to get desirable consistency. Check salt and add more if needed based on taste. (or) use a pressure cooker and cook for 10-12 mins.
  2. Heat 1 tsp oil in a heavy bottom pan, add the other half of tomatoes and sauté for 7-8 mins.
  3. Add the tomatoes and chill powder, cook for another 2-3 mins, or till the tomatoes get soft.
  4. Add the cooked dal and tamarind paste/water and let it boil for 2-3 mins. You can add more water if needed to get desired consistency.

Tempering:

  1. Heat Ghee in a small pan. Add the curry leaves, cumin, mustard seeds and dried red chillies. Let it crackle.
  2. Add the Garlic and cook till you smell the aroma.
  3. Pour this entire tempering, along with the ghee in to the cooked dal and mix it in. You can also serve with the tempering on top of it.

Garnish with chopped cilantro leaves.

Notes:

  • I prefer plum Tomatoes for this recipe because of their meatiness.
  • I use Shallots because they integrate better and have a milder flavor, you can use 1 regular onion if thats what you have in your pantry.
  • Oil can be used instead of Ghee for the tempering.

Sondesh (milk confectionary)

IMG_2130

Bengali’s are known for their sweet tooth and the vast variety of ethnic sweets. I am part of the exception, I do not like sweets! When I was younger, my sister had me convinced that I was adopted because I did not share the sweet tooth of my family.

“See mom likes sweets, dad like sweets, I like sweets all our uncles and aunts and cousins love sweets. But you don’t .” she said.

“But I look exactly like dad!” I argued.

“Plastic surgery” Was her quick reasoning.

Older siblings, and their pranks! However, there are a couple exceptions to my taste preference. There are three desserts that I absolutely love (and can eat endlessly!): Tiramisu, Rasogolla and Sondesh. Especially the one made by one of my favorite person in the entire world, monju kakima, who I fondly call ‘Best Friend’. Luckily she is also a good teacher.

Sondesh is probably one of the most popular Bengali sweets, even outside of the Bangali crowd. And all you need for it is some milk and sugar. Now if you can get your hands on some ‘Patali gur’ (a special type of jaggery made from Date Palm Syrup) the this dessert just becomes extraordinary.

Time for Prep: 5 mins    Time to Cook: 20-30 mins    Yield: 8-10 servings    Level: Easy

Ingredients: 

  • Half gallon – Whole Milk
  • Juice of 1 lime (around 1.5 tbsp)
  • 6 tbsp sugar

Process:

IMG_2124

  1. Curdle milk to make ‘Channa’:
    1. Bring milk to a boil, add the lemon juice and lower heat. In a few seconds you will notice the milk solids forming. When the water is completely separated (turns a greenish shade) remove from heat and drain into a colander lined with cheese cloth.
    2. Run a little bit of water on it to get rid of the lemony taste, drain.
    3. Gather the ends of the cheese cloth and bring them together, like a purse, slowly squeeze out the water. Be careful not to burn your hands as it is really hot.
    4. This is now my mom does it: Hold the ends with your left hand and using a pair of tongs hold the purse just on top of the solids with your right. Then slowly twist the cloth with your left hand. The water squeezes out without resulting in burning fingers.
    5. Place it on a flat plate and weigh it with something heavy, I use my motar or a container filled with water. Let this sit for around an hour. IMG_2126 IMG_2127
  2. Knead the Channa: 
    1. Knead channa with the heel of your palm or the back of a bowl for 7-8 mins.
    2. Add sugar and knead for additional 4-5 mins. Till the sugar is completely blended in.
    3. When it all comes together and you have something that looks like a soft ball of dough, stop knead.
  3. Shape to make Sondesh:
    1. If you have molds, this is when you use it. or
    2. Shape them into balls.
    3. What I do: Shape them into balls, then flatten them a little. At this point the artist in me takes over and I use things around me to make a mark. For the Sondesh in this picture, I used a frother.
    4. You can further decorate by staining them with Saffron, adding raisins, pista etc..,.

Bharwan Bhindi (Stuffed Okra)

IMG_2082

I inherit my love for good food and hospitality from both my parents, an apple can fall only so far away from the tree. My dad or us (my sister and me) would make a special request, dad would make a tidy shopping list with my mom and get all she needed, she then whipped up awesomeness in her kitchen. If the way to a man’s heart is through his stomach, my mom sure had the golden stairs leading to my dads. Someday I hope to be as good a cook as my mom.

Mom grew up in Rajasthan and thats how some of the typical Rajasthani food made its way to our dinner table. This is one of them and another family favorite. If I could give an award for lifetime favorite dish, this would be it. And I think this dish has a lot to do with how Okra became my favorite vegetable (even more than potatoes!).

If this was on the menu for dinner, I volunteered to help. Mom and I would sit, talk about our day and fill one Okra at a time with the spices. So here’s two things I learnt from that: First, the spice mix has turmeric and if your using your fingers to fill the Okra, your nails will turn yellow. So if you have just spent $$ on a Manicure use a spoon. Second, this is a time consuming process so if you are in need for a quick weeknight dinner, then this dish may not be the one.

Time for Prep: 30 mins     Time to Cook: 25 mins    Yield: 4 servings    Level: Medium

IMG_2071

Ingredients:

  • 1 lb Okra
  • 2-3 tbsp of oil (I prefer mustard oil).
  • 2 tbsp coriander powder
  • 2 tbsp cayenne or chilli powder
  • 2 tbsp cumin powder
  • 2 tsp turmeric powder
  • 1 tsp salt or to taste (I use rock salt)
  • 1.5 tbsp amchur (dry mango powder)

IMG_2075

Process:

  1. Wash and wipe dry the Okra. Pre-heat oven to 400F.
  2. Trim both ends, slit each of them vertically. Be careful not to break or cut it into half.
  3. Combine all the spices, add oil and mix it up.
  4. Fill each Okra with the spice mix.
  5. Layer in a baking sheet and bake for 25 mins
  6. If cooking on stove top. Heat a tbsp of oil in a skillet, add the stuffed Okra and cook until tender.

IMG_2072IMG_2073

IMG_2077

Notes:

  • The Okra needs to be dry with no trace of water. Water causes Okra to get slimy.

Jhaal Bhindi (Okra in spicy mustard sauce)

IMG_2078

‘Jhaal’ in Bangla means spicy. But when talking in context of a dish, it takes a whole new meaning.

Bengali cuisine has 3 main types of sauce/gravy, the everyday light and soupy ‘Jhol’, the rich and thick ‘Dalna’ and the mustard sauce based ‘Jhal’. Traditionally the primary ingredient in Jhal is fish. Since I fell in love and married a South Indian brahmin boy who cannot tolerate the smell of fish, I improvise and usually make it with eggs instead. I know! Love gets you to make all sorts of sacrifices, in this case, Fish. If your not from India, then here’s some context, the staple food of a Bengali household is fish. And for a bengali to sacrifice her daily dose of ‘Maach Bhaath’ (Fish curry and rice) is a big deal!!

This Sunday at the local farmers market I found a farmer selling Okra, fresh organically grown local Okra. This being my favorite vegetable, it almost felt like hitting a jackpot so I went ahead and bought 5 lbs. Essentially, we will be eating a lot of Okra for the next few days. I looked at the Okra and the hard boiled eggs next to it and thought, why not. So here goes.

Like I mentioned in an earlier post, I really dig how shallots integrate into the gravy and give it a smooth sweet flavor and thats exactly what is needed for this recipe to work. I also recommend using Plum tomatoes because it has more meat, less seeds and its perfect for creamy sauces. See picture below.

IMG_2074

Time for Prep: 20 mins     Time to Cook: 30-40 mins    Yield: 6 servings    Level: Easy

Ingredients:

  • 1 lb Okra, cut in 1 inch long chunks.
  • Oil, to cook the Okra (1 tbsp if baking, 4 tbsp if frying)
  • Salt to taste
  • 1 tsp cayenne or chilli powder
  • 2 tsp mustard oil
  • 2 Shallots, chopped
  • 1 plum tomato, chopped
  • 3-4 fresh green chili pepper, slit.
  • 2 tbsp cilantro, chopped
  • 1 cup water

For the mustard paste:

  • 2 tbsp yellow mustard seeds
  • 1 tbsp black mustard seeds
  • 2 tsp poppy seeds
  • 4-5 fresh green chili pepper
  • 1 clove of garlic
  • water

IMG_2069

Process:

For the mustard paste:

  1. Soak the mustard and poppy seeds in water for 30 mins
  2. Drain and transfer into a blender, add clove of garlic and green chili peppers. Blend with water until thick and smooth paste.
  3. Pour in a bowl and set aside

For the Okra:

  1. Pre-heat oven to 400F, layer okra on a baking sheet drizzle with oil and bake for 30 mins. (or) Heat oil in a skillet, fry the Okra till it turns bright green. Sprinkle salt and chili powder when done and set aside.
  2. In a heavy bottom pan, 1 tsp of oil. Add the shallots, sauté for 3-5 mins, then add tomato and green chili and cook for an additional 4-5 mins.
  3. Add the mustard paste, mix and let cook for 2 mins. Add water and bring to a boil. Add salt, chili powder and turmeric and simmer for 3-4 mins, until it begins to become thick.
  4. Add the cooked Okra in, be gentle when folding it in. Simmer for 2-3 mins.
  5. Garnish with chopped cilantro.

Notes:

  • Be careful not to over cook the mustard paste, it tends to become slightly bitter.
  • You can double the quality of mustard paste and store refrigerated in an airtight container for 14-15 days.
  • Feel free to replace Okra with your favorite vegetable, don’t forget to leave a comment here to let me know how it turned out.