Fried Rice

img_4284

My mom is the queen of the kitchen, which meant growing up I never cooked! Fast forward to 2005 standing in my kitchen in Connecticut I figured fried rice would be the easiest thing to pull off, right? Wrong! While it tasted good, the texture was completely off, more like awful, because of some obvious mistakes. What followed was a teary conversation with mom, mostly because I was really homesick and couldn’t even cook myself a decent warm meal. This post is more about the secret tips that mom shared with me that day, than about the actual recipe. This recipe is a basic one and can be modified to make your own. Add different vegetables, may be some protein…

The secret to a good fried rice is starting with cold cooked grains! Now that I think of it mom always cooked the rice the day before. The reason is simple, dehydration of the grains. Refrigeration makes the grains dry, and then when cooked it gets hydrated just right. Fresh cooked rice gets mushy! When in the moment spread fresh cooked rice in a baking sheet and chill it in the refrigerator for 15-20 mins. This will take care of any residual moisture and give your dish the fried texture.

Heat! High heat is important. As my mom’s lil helper I would love adding things to the pan but I wasn’t that patient. So I would go “Aikhon Di”(should I add now) and mom would roll her eyes and say “Daada, gorom hoi ni”(wait its not warm enough yet) because it was probably the 4th or 5th time! High heat ensures that whatever is added to the pan gets fried quickly, so the rawness goes but the crunchiness stays.

“Ghatish Na”(Don’t stir it too much) was what she screamed at me when this eager helper, kept stirring the rice. Constant stirring will cause the grains to break and get starchy, then mushy. Also it prevents the rice from getting that crunchy crusty texture. So spread the rice out in the pan, let it sit for a minute or so before flipping it.

So the secret to Jhojhore (fluffy), slightly crusty fried rice is – dehydrated cooked rice, cooking in high heat and no to constant stirring! To never again mushy fried rice… Happy cooking!!

Time for Prep: 10 mins     Time to Cook: 10 mins     Yield: 4-5 Servings     Level: Easy

Ingredients:

  • 2 cups rice, cooked.
  • 1 tbsp butter
  • 1/4 cup red bell pepper, chopped
  • 1/4 cup yellow bell pepper, chopped
  • 1/4 cup orange bell pepper, chopped
  • 1/4 cup green bell pepper, chopped
  • 1/2 cup carrots, chopped
  • 1 onion, chopped
  • 1/2 cup green peas
  • 1/2 cup sweet corn
  • 1/2 cup scallions, chopped
  • 1 tbsp soy sauce
  • 2 tbsp black pepper, ground
  • salt to taste

Process: 

  1. Heat oil in a wok, add the vegetables (except scallions) and sauté in high heat for 4-5 mins, just so that the rawness goes but they still retain the crunchiness.
  2. Add cooked rice, salt, ground black pepper and butter, stir it in and cook for another minute or so.
  3. Pour the soy sauce, around the edges of the wok and gently fold it in.
  4. Remove from heat, garnish with chopped scallions and serve.

Kumror (Pumpkin) Chokka

img_6127

Fall is my favorite time of the year the slight nip in the air, the smell of pine, festivities everywhere and fall vegetables, I love every one of them! Chokka in bangla means a spiced dish of vegetables cooked almost dry. Kumror Chokka is a traditional bengali dish that is made using Pumpkins, potatoes and chickpeas.While traditionally this dish is made during the summer months, I make this in fall, with fresh Pie Pumpkin or Butternut Squash from the local farmers market. Serve it with Porotha or Puri and its just perfect of cold evenings.

This dish was very popular in my maternal grandparents house. Story goes that when ever my grandparents argued about something, my granddad would step out and comeback home with a Pumpkin as peace offering. And my grandmother would make this, their favorite dish and they would laugh about their disagreements over a meal. Love Birds!

This and a few other bengali recipes will call for Paanch Phoron for tempering. It is a combination of Cumin Seeds, Mustard Seeds, Fenugreek Seeds, Fennel Seeds and Nigella Seeds in equal proportion. 

Time for Prep: 20 mins     Time to Cook: 15-20 mins    Yield: 6 servings    Level: Easy

Ingredients:

  • 1 Pie Pumpkin or Butternut Squash, cut into cubes
  • 1 medium sized potato, cut into cubes
  • 1 cup cooked chickpeas
  • 3-4 green chile pepper
  • 3-4 cloves of garlic
  • 1/2 inch ginger
  • 1/2 tbsp Paanch Phoron
  • 1-2 dried red chilli pepper
  • 1 tbsp oil (preferably mustard oil)
  • 1 tsp turmeric
  • 1 tsp roasted cumin powder
  • 1 tsp coriander powder
  • 1 tsp chilli powder
  • salt to taste
  • 2 tbsp cilantro, chopped for garnishing
  • 1 tsp ghee (optional)
  • 1 tsp garam masala

Process:

  1. Heat oil in a Wok on medium heat, add paanch phoron and dried red chilli pepper. Sauté till aromatic.
  2. In the mean time muddle together ginger, garlic and fresh green chile pepper with a pestle
  3. Add the potatoes, muddle spices, turmeric and salt to the now aromatic temper. Sauté for 4-5 mins.
  4. Add butternut squash/pumpkin and chickpeas, mix them in. Cover and cook till vegetables are done (tender) around 10-12 mins.
  5. Let the vegetables char a little at the bottom.
  6. Remove from heat, fold in the thin charred crust.
  7. Garnish with ghee, garam masala and chopped cilantro.


Aloo Pyager Chorchuri (Potato-Onions Stir-Fry)

IMG_2088

Chorchuri is a char flavored bengali style stir fry, Chorchori being the noun and the vegetable used to make it, the adjectives. As a child I had asked my mom why this dish was called Chorchori, she said it is because when the vegetables are getting charred, they make a sizzling sound that sounds like ‘chor’ which is also an indicator that the dish is almost done. I am not sure if that’s accurate or not, but thats the story I go with.

Any number of vegetables can be used to make this, but in the Aloo loving Mukherjee household, potatoes have always been the main ingredient with others making a guest appearance or not. This particular dish was a breakfast favorite served with Luchi or Bashi Porotha (Stale Parathas made the night before). There is something about warm porotha, potatoes along with the smell and taste of mustard oil that makes it one of the most comforting dish for lazy mornings.

The charred part is the best part of the dish and my sister and I always called dibs on who gets to clean up (read lick) the wok, mom won most times, go figure!

fries-how-to-cut

I like to cut the potatoes and onions in wedges, because thats how my mom did it, but its not a rule.

This and a few other bengali recipes will call for Paanch Phoron for tempering. It is a combination of Cumin Seeds, Mustard Seeds, Fenugreek Seeds, Fennel Seeds and Nigella Seeds in equal proportion. 


Time for Prep: 20 mins     Time to Cook: 20-30 mins    Yield: 6 servings    Level: Easy

Ingredients:

  • 2-3 medium size potatoes, cut into wedges
  • 1 medium sized onion, cut into wedges
  • 3-4 green chile pepper, slit
  • 1 tbsp Paanch Phoron
  • 1 tbsp oil (preferably mustard oil)
  • 1 tsp turmeric
  • salt to taste
  • 2 tbsp cilantro, chopped for garnishing

Process:

  1. Heat oil in a Wok on medium heat, add paanch phoron. Sauté till aromatic.
  2. Add the potatoes, onions, green chili pepper,  turmeric and salt. Sauté, cover and cook till vegetables are done (tender) around 12-15 mins.
  3. Let the vegetables char a little at the bottom.
  4. Remove from heat, fold in the thin charred crust.
  5. Garnish and serve.

Note:

  • If you want to add some protein in to it, shrimp or scallops is the way to go.

Vegetable Manchurian

IMG_4267Indo- Chinese cuisine took birth in the streets of Kolkata by a small group of Chinese immigrants incorporating traditional Chinese cooking techniques and seasoning to create dishes catering to Indian tastes. A big part of it was providing a wide range of vegetarian options. Through years of evolution, this cuisine now bears very little resemblance to traditional Chinese food, except may be the use of soy sauce.

Good Indo-Chinese food is almost impossible to find in US, I have followed every lead I got (which includes my cousin driving an hour for a carry out!!) but the food never met expectations. So this became one of those pet projects of mine and I have finally managed the India wala taste. And the best part, this is MSG FREE!
IMG_4279This dish is one of the most popular street food in India, grated mixed vegetable dumplings are first fried and then sautéed in soy sauce (and more) and served hot as is or as a side dish with Hakka Noodles or Fried Rice. Dry version serves as a good appetizer and the gravy version is perfect with some Fried Rice or Steamed Rice. Restaurants add a whole bunch of MSG (may be thats why its so addictive?), I use a tbsp of butter instead to get similar flavor.

Here I am deep frying the fritters, but in the past I have tried to bake it too. Make the vegetables balls following steps listed below, on a cookie sheet layered with parchment paper place them around 1/2 inch apart from each other,  spray a little oil and baked for 20 mins in oven pre-heated to 400F/205C, then broiled for 5 mins, flipping them halfway. While it definitely is a lot healthier, it doesn’t taste the same.

Time for Prep: 20 mins     Time to Cook: 20 mins     Yield: 16     Level: Easy

Ingredients:

  • Finely chopped vegetables
    • 1/4 cup carrots
    • 1/4 cup green bell pepper
    • 1/4 cup red bell pepper
    • 1/2 cup cauliflower
    • 1/2 cup cabbage
    • 1/2 cup scallions
  • 2 tbsp all purpose flour
  • 3 tbsp corn starch
  • 1 tbsp rice flour
  • 2-3 thai chilli pepper, finely chopped
  • 1 inch ginger, grated (or 1.5 tbsp ginger powder)
  • 5-6 garlic cloves, minced
  • 3 tbsp soy sauce
  • 2 tbsp tomato sauce or ketchup
  • 1 tbsp chilli sauce or siracha
  • 2 tsp rice vinegar
  • 3 tsp black pepper power
  • 1 tsp brown sugar
  • 2 tbsp cilantro, finely chopped
  • salt to taste

Process:

  1. Heat oil for deep frying in a heavy bottomed vessel.
  2. In a bowl, combine all the finely chopped vegetables. Add salt, mix it in and let it sit aside for 10-15 mins. vegetables (especially cauliflower) will release quite a bit of water.
  3. Add all-purpose flour, corn starch, rice flour, half of ginger, garlic and thai chilli pepper, black pepper, 2 tsp soy sauce. Mix them all in. Add water, if needed, little by little and use only as much water as required to form small balls. You should be able to make small balls as shown in the picture above. Be mindful while adding water and add only 1 tbsp at a time.
  4. Carefully place each ball into the hot oil. Do not crowd the vessel. Reduce flame and deep fry the vegetable balls till cooked and is golden brown. Remove onto absorbent paper and keep aside.
  5. Heat oil in a large wok, add the whites of scallions and garlic, sauté for a few seconds. Add the rest of chilli pepper and ginger and stir fry on high for a few seconds.
  6. Add the vegetable balls and stir fry on high for 2 mts, constantly tossing them.
  7. Reduce to medium heat and add the brown sugar, soya sauce, tomato ketchup, chilli sauce and vinegar. Mix well and cook for 2 mts.
  8. Toss on high flame for 1-2 mts. Turn off heat. Garnish with the chopped spring onion greens and/or coriander leaves.

Notes:

IMG_4276

To make Vegetable Manchurian with Gravy:

  • Mix a tbsp of cornflour in a little water. Keep aside.
  • After following step 5 above, add 1 1/2 cups water and bring to a boil. Reduce to medium heat and add the brown sugar, soya sauce, tomato ketchup, chilli sauce and vinegar.
  • Add the cornflour water slowly and keep stirring till it takes a thick gravy like consistency. Cook for 1-2 mts. Turn off heat.
  • Add the fried vegetable balls to the gravy at the time of serving. Garnish with chopped spring onion greens and/or coriander leaves.

Peas Pulao

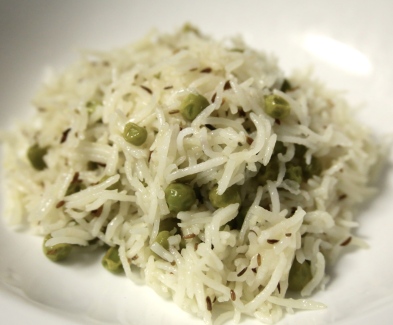
IMG_4106

This past week marked the 42nd wedding anniversary of my parents, growing up we celebrated the day with a gathering of friends and family and my mom like always cooked up a feast. Peas Pulao or ghee bhaath, always played an award winning supporting role, complimenting the flavors of the side dishes. In my opinion this dish is the underdog of bengali cuisine and never gets its due credit. Long grained basmati rice flavored with aasto gorom moshala (whole spices), jeere (cumin) and ghee makes for perfectly light and aromatic companion to pretty much any side dish, or to be eaten as is.

Time for Prep: 5 mins     Time to Cook: 15 mins     Yield: 6 Servings     Level: easy

Ingredients:

  • 2 cups of Basmati rice
  • 1/2 cup green peas (fresh or frozen)
  • 1 inch stick of cinnamon
  • 4-5 green cardamom
  • 1 black cardamom
  • 1 Bay leaf
  • 7-8 cloves
  • 1 tbsp black peppercorns
  • 2 tsp caraway seeds
  • 2 tsp cumin seeds
  • 1 tbsp cilantro, chopped
  • 1 tbsp mint, chopped
  • 2 tbsp ghee or oil
  • 1 tbsp lemon juice
  • 3.5 cup water or broth.
  • Salt to taste
  • 1/4 tsp sugar

Process:

  1. Rinse and soak rice for 30 mins. Drain and set aside.
  2. In a heavy bottom pan heat the ghee and add caraway seeds, cumin, cinnamon, cardamom, bay leaf, cloves, black peppercorns. Sauté for till you begin getting the spice aroma around 2-3 mins.
  3. Add the drained rice, which should’ve gotten a little dry by now. Mix and sauté for around 2 mins or until the rice is well coated and starts to glisten.
  4. Add green peas, cilantro, mint and sauté for a minute before adding water, salt, sugar and lemon juice. Stir slightly.
  5. Cover and let cook for around 12-15 mins, when the rice is almost done and there is still a little bit of moisture remaining. Turn off the heat and let it sit for 20-30 mins.
  6. Using a fork, fluff up the rice a little. Serve with your favorite side dish or with just Raita.

Notes:

  • For rice that is fluffy and each grain of rice is separated drain and spread soaked rice on a paper towel or cotton towel to dry it out before cooking. While cooking fry/sauté the rice grains for a 2-3 mins before adding water. While doing so make sure that you don’t stir too vigorously, that will break the rice grain and you will not get those long grains of rice that are visually so appetizing.
  • If your using frozen green peas, thaw it before using.